Assembly: Seven Steps
The goal of the assembly process is to convet raw or sorted fastq data into assembled loci that can be formatted for downstream analyses in phylogenetic or population genetic inference software. In ipyrad we have purposefully atomized this process into seven sequential steps to create a modular workflow that can be easily restarted if interrupted, and can be branched at different points to create assemblies under different combinations of parameter settings.
Basic Assembly Workflow
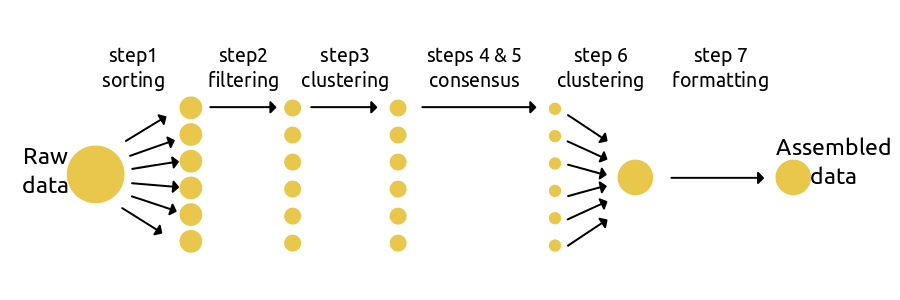
The simplest use of ipyrad is to assemble a data set under a single set of parameters defined in a params file. Step 1 loads/assigns data to each sample; steps 2-5 process data for each sample; step 6 identifies orthologs across samples; and step 7 filters the orthologs and writes formatted files for downstream analyses.
The code to run a basic workflow is quite simple:
# create an initial Assembly params file
>>> ipyrad -n data1

# enter values into the params file using a text editor
## ... editing params-data1.txt

# select a params file (-p) and steps to run (-s) for this assembly
>>> ipyrad -p params-data1.txt -s 1234567
Advanced Branching workflow
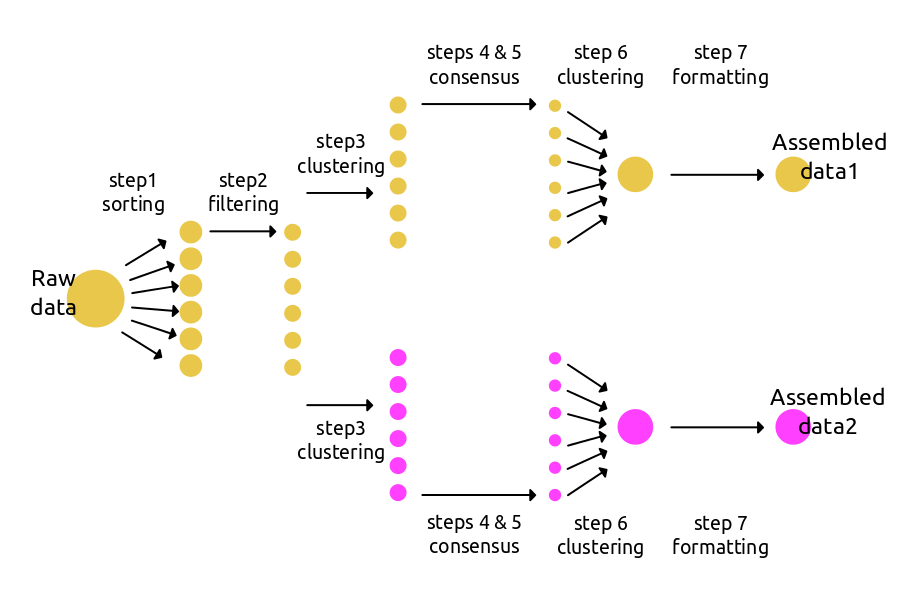
A more effective way to use ipyrad can be to create branching assemblies in which multiple data sets are assembled under different parameter settings. The schematic below shows an example where an assembly is branched at step3. The new branch will inherit file paths and statistics from the first Assembly, but can then apply different parameters going forward. Branching does not create hard copies of existing data files, and so is not an “expensive” action in terms of disk space or time. We suggest it be used quite liberally whenever applying a new set of parameters.
The code to run a branching workflow is only a bit more complex than the basic workflow. You can find more branching examples in the advanced tutorial and cookbook sections.
## create an initial Assembly and params file, here called 'data1'
>>> ipyrad -n data1

## edit the params file for data1 with your text editor
## ... editing params-data1.txt

## run steps 1-2 with the params file
>>> ipyrad -p params-data1.txt -s 12

## create a new branch of 'data1' before step3, here called 'data2'.
>>> ipyrad -p params-data1.txt -b data2

## edit the params file for data2 using a text editor
## ... editing params-data2.txt

## run steps 3-7 for both assemblies
>>> ipyrad -p params-data1.txt -s 34567
>>> ipyrad -p params-data2.txt -s 34567
Seven Steps
1. Demultiplexing / Loading fastq files
Step 1 loads sequence data into a named Assembly and assigns reads to Samples (individuals). If the data are not yet demultiplexed then step 1 uses information from a barcodes file to demultiplex the data, otherwise, it simply reads the data for each Sample.
The following parameters are potentially used or required (*) for step1:
max_barcode_mismatch
2. Filtering / Editing reads
Step 2 uses the quality score recorded in the fastQ data files to filter low quality base calls. Sites with a score below a set value are changed into “N”s, and reads with more than the number of allowed “N”s are discarded. The threshold for inclusion is set with the phred_Qscore_offset parameter. An optional filter can be applied to remove adapters/primers (see filter_adapters), and there is an optional filter to clean up the edges of poor quality reads (see edit_cutsites).
The following parameters are potentially used or required (*) for step2:
3. Clustering / Mapping reads within Samples and alignment
Step 3 first dereplicates the sequences from step 2, recording the number of times each unique read is observed. If the data are paired-end, it then uses vsearch to merge paired reads which overlap. The resulting data are then either de novo clustered (using vsearch) or mapped to a reference genome (using bwa and bedtools), depending on the selected assembly method. In either case, reads are matched together on the basis of sequence similarity and the resulting clusters are aligned using muscle.
The following parameters are potentially used or required (*) for step3:
4. Joint estimation of heterozygosity and error rate
Step4 jointly estimates sequencing error rate and heterozygosity based on counts of site patterns across clustered reads. These estimates are used in step5 for consensus base calling. If the max_alleles_consens is set to 1 (haploid) then heterozygosity is fixed to 0 and only error rate is estimated. For all other settings of max_alleles_consens a diploid model is used (i.e., two alleles are expected to occur equally).
The following parameters are potentially used or required (*) for step4:
5. Consensus base calling and filtering
Step5 estimates consensus allele sequences from clustered reads given the estimated parameters from step 4 and a binomial model. During this step we filter for maximum number of undetermined sites (Ns) per locus (max_Ns_consens). The number of alleles at each locus is recorded, but a filter for max_alleles is not applied until step7. Read depth information is also stored at this step for the VCF output in step7.
The following parameters are potentially used or required (*) for step5:
6. Clustering / Mapping reads among Samples and alignment
Step6 clusters consensus sequences across Samples using the same assembly method as in step 3. One allele is randomly sampled before clustering so that ambiguous characters have a lesser effect on clustering, but the resulting data retain information for heterozygotes. The clustered sequences are then aligned using muscle.
The following parameters are potentially used or required (*) for step6:
7. Filtering and formatting output files
Step7 applies filters to the final alignments and saves the final data in a number of possible output formats. This step is most often repeated at several different settings for the parameter 21. min_samples_locus to create different assemblies with different proportions of missing data (see Assembly: Branching and Merging).
The following parameters are potentially used or required (*) for step7:
trim_overhang
Example CLI branching workflow
## create a params.txt file and rename it data1, and then use a text editor
## to edit the parameter settings in data1-params.txt
ipyrad -n data1

## run steps 1-2 using the default settings
ipyrad -p params-data1.txt -s 12

## branch to create a 'copy' of this assembly named data2
ipyrad -p params-data1.txt -b data2

## edit data2-params.txt to a different parameter settings in a text editor,
## for example, change the clustering threshold from 0.85 to 0.90

## now run the remaining steps (3-7) on each data set
ipyrad -p params-data1.txt -s 34567
ipyrad -p params-data2.txt -s 34567
Example Python API branching workflow
## import ipyrad
import ipyrad as ip

## create an Assembly and modify some parameter settings
data1 = ip.Assembly("data1")
data1.set_params("project_dir", "example")
data1.set_params("raw_fastq_path", "data/*.fastq")
data1.set_params("barcodes_path", "barcodes.txt")

## run steps 1-2
data1.run("12")

## create a new branch of this Assembly named data2
## and change some parameter settings
data2 = data1.branch("data2")
data2.set_params("clust_threshold", 0.90)

## run steps 3-7 for the two Assemblies
data1.run("34567")
data2.run("34567")